Showing posts with label Cooking Basics. Show all posts

Wednesday, June 24, 2009

Bhindi ki bhujya (Oakra) - Basics III

Even as a child, one of my most favorite vegetables was Bhindi (okra, lady fingers). My mom would make this really quick version with lots of sliced onion and tomato, sautéed with the bhindi and just a few spices. It was delicious and when I was old enough to cook, it was one of the things I often made.

So before I give you the recipe, let me back track and explain the title of this post. Bhindi ki Bhujya, bhindi is okra and bhujya is an Urdu term used to describe any sautéed vegetables. So be it allu (potato), baingan (eggplant), gobi (cauliflower), etc. they can all be made in to bhujya's. If you remember in one of my first posts on cooking basics I explained how sabzi's (vegetables) are made in to "bhujya" or added to meat and form "saalan" (curry's/gravy). I also explained what bhagaar is and how it works as either a base or garnish. You will need these tips make this recipe...

You will need:
1 medium onion sliced
1 tbsp zeera (cumin seeds)
2 to 3 sabuth laal mirch (dried whole red chili)
1 tsp garlic paste
1/4 to 1/2 of a lemon or lime
1 to 2 Roma tomatoes diced
salt (to taste)
1 bag frozen (cut) bhindi or about 4 cups chopped fresh bhindi

In a large skillet, prepare your bhagaar... heat some oil then add the zeera and laal mirch. Wait till the zeera starts to get some color and add in the onion. Over high heat sauté until the onion starts to get translucent. Add in the garlic paste, bhindi, salt and lemon/lime. Sauté for a few minutes until all of the ingredients are mixed well. Add in the tomatoes, stir and cover. Lower the heat to medium or medium low and let cook until the tomato starts dissolving. Turn/stir the bhindi a few times during the process to ensure even cooking. Once the tomatoes have dissolved, uncover and sauté until there is no water/liquid remaining. There should be some juice in the vegetables (onion, bhindi, etc) but the mix should be fairly dry. But be careful! Do not overcook and dry out your vegetables...


That's it! Simple and quick :) Hope you'll enjoy this bhujya as much as I do... it’s very nutritious and tastes good too. Happy cooking!!!

Thursday, April 23, 2009

Sloppy Joe's!!!

Hello Everyone! I know its been forever and a day since I posted anything new and I am so sorry. BUT this long hiatus was not unfounded. I've been busy with so many creative things (lots of cooking too) and haven't had a chance to write. I will diligently try to update as much as possible in the next few weeks, all while packing and moving!!! In the mean time, you can check out one thing thats been keeping me busy these past few weeks http://www.sindulgellc.com/

I'm taking a break from packing up our apartment right now and decided, since I have a quick minute, to type up a quick recipe from the other day. I honestly can not remember the last time I had a sloppy joe, maybe back in grade school? A good friend came over when I made these and she said she had only had them once in her life when she was a little girl in school. When was the last time YOU had a Sloppy Joe?

Because we are moving soon and I've been busy packing and avoiding grocery shopping, I took a short cut on dinner by whipping these up (takes all of 20 min) and using a Manwich sauce can as a base. I substituted ground turkey for the ground beef traditionally used since my husband isn't allowed to eat red meat (cholesterol). For sides, I baked some fries (pre-packaged) and made a simple mushroom and sweet corn casserole. We had a "fast-food" meal at home, with out the extra fat and unhealthy ingredients...

All you need is:
1 can (15 or 16 oz) Manwich Sauce
1 small onion
1 tsp garlic paste
2 tbsp cooking oil
~1lb ground turkey (or beef if you want)
1 tbsp Worcestershire Sauce
1 1/2 tsp apple cider vinegar (optional)

Chop (dice) the onion and saute over medium heat until it becomes translucent. Add the garlic and mix, then add your meat (rinsed and drained). Cook the meat covered, stirring occasionally, until no longer pink. Uncover and continue to cook for a few min. Add the Worcestershire Sauce and vinegar (if you want). Stir well. After a few minutes (when the liquid reduces a bit) add the Manwich sauce, stir well and cook for a few minutes until it reaches a consistency you like. That's it! Simple and quick, it shouldn't take more than 20 to 25 minutes.

Pour your mixture on to hamburger buns (you can also use regular sandwich bread, pita or hot dog rolls) and sprinkle with some shredded cheese (if you like). I used the Mexican four cheese blend and it melts right on to the mix when its hot off the stove. Enjoy... and don't worry about the mess!

Sunday, March 1, 2009

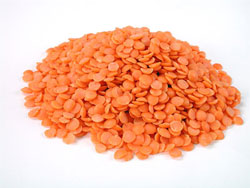
Masoor ki Daal (lentil)

One classic meal in Desi cooking is Daal Chawwal (lentils and rice). Basmati rice(or other long grain rice) and lentils are a staple for almost every meal, everything else is a plus. Usually for dinner in a desi household there will be chawwal, daal, subzi (vegetable) and salaan (meat dish). Growing up, I remember my parents always saying that anytime there wasn't daal chawwal for dinner, they didn't feel they had a complete meal.

My favorite daal among the many available is Masoor ki daal. Now there are two kinds of Masoor available, red and black or green. The more common one is laal (red) daal and one of the easiest to make. People from different parts of Pakistan and India make daal in a number of different ways. The method I will share here is the traditional Dehli/UP (Utthar Pradesh) way of making lentils, by boiling it with some simple masaala's and then adding bhagaar at the end.

1 cup laal daal, picked over and rinsed
~2 cups water
1tsp salt
1/2 tsp laal mirch (red chili powder) or to taste
1/3 tsp haaldi (powder)
1/2 tsp garlic paste

In a medium heavy bottom sauce pan, add your rinsed lentils, water and all of the other ingredients. Bring to a boil and then lower stove to medium/low to low. Simmer the lentils until all the water is dry. The lentils should be soft and a pale yellow color (no whitish middles, that means they're still undercooked and will not mash. If this happens, add a little water and simmer again until there is no whitish middle). Take a large spoon and mash the lentils until they become like a thick paste...kind of like watery mashed potatoes. Then turn the stove back on to low and add water while stirring until it reaches a thick soupy consistency.

Simmer the daal until it is near boiling. DO NOT LET IT BOIL. You want to heat it to mix in the water well but do not boil, just simmer. On the side prepare a bhagaar of onions and zeera (cumin seeds). Add the bhagaar to your daal just before turning off the stove. Serve with white rice.

Monday, February 23, 2009

Sauteed Shrimp

Today I'm going to share something so simple and relatively healthy with you. This dish can be paired with or added to a number of things. You can have it on its own or add it to rice, pasta, fresh salsas, soup, salads, etc. I usually get frozen shrimp (peeled and de-veined) because I don't want to handle raw shrimp and have to de-vein it myself. I recently made this shrimp and served it with pasta and an asiago cheese sauce.

1lb frozen shrimp (thawed out per instructions on package)
1tbsp olive oil
1tbsp butter (salted or unsalted)
some chopped garlic (to taste)
salt (to taste)
crushed red pepper (to taste)
3 to 4 fresh basil leaves, chopped

In a non-stick skillet add your olive oil and butter. Heat on medium until the oil is hot but not burning (be careful because we don't want the garlic to burn). Add the garlic, red pepper and fresh basil. Keep stirring to release the aroma but do not burn your garlic. One you've heated the ingredients enough to release their flavor and aroma in to the oil, add the shrimp and lower the stove to medium-low. Add salt to taste. Let the shrimp cook on one side for about 3 min and then flip and cook on the other side for 3 to 4 min. Keep the skillet covered to allow steam. Shrimp, if over cooked, becomes very tough so be careful not to over cook. The steam will help to keep the shrimp juicy.

Once ready, you can add it to your sauce, have on its own with rice or couscous, have it on a salad or even bake it in a casserole. The options are endless but the method simple, quick and healthy because with the garlic and basil, we don't need to add too much salt. We also add in olive oil to reduce the amount of butter used for sauteing shrimp.

Good luck, be creative and eat smart!

Basic Masaala's

Think of this as something similar to Emeril's famous Essence or the famous Louisiana BBQ spice rubs. Only difference, the concoctions I'm going to share date back to the Mughal period, when dishes created for royalty became popular and eventually common among the Muslim households. Some of these masaala (spice) mixes are also a melding of the Muslim and Hindu cultures, which coincided in the Sub-continent (what is now South Asia). Certain spices are common in the Hindu way of cooking and some (mostly those for meat dishes) are particular to the Muslim style of cooking and an influence from the Persians and Turks.

I will share with you some common masaala's which you can use to create a number of different Desi dishes. Remember from my last post on basics, I explained the concept of bhagaar...well these spices are usually added to warm oil at the start of cooking, thus creating the base.

"Phorran" is an old term used to describe a certain spice mix, but the literal translation of the word is prescription or recipe (as relating to medicine). "Panch (#5) Phorran" is a spice mix of five spices, often used for certain types of vegetables and chicken, but can be adapted for cooking some meat curry's as well. The more common term for Panch Phorran is Achar ka Masaala (pickling spices); most Desi people today would know the term Achaar (pickle) since they use the condiment regularly with meals, eg. Aamn ka Achaar (mango pickle), Nimbo ka Achaar (lemon/lime pickle), etc. The five spices required for achaar ka masaala are:

Zeera (cumin seed) (do not confuse with caraway)
Sonph (fennel seed)
Kalonji (Nigella seed) (do not confuse with onion seed or black sesame)
Rai (Brown Mustard seed)
Mehthi Dana (Fenugreek)

When cooking with these spices, you would traditionally use equal parts of each spice. I often use more zeera and avoid the use of mehthi because of its bitter taste and side affects (you can smell it in your sweat and urine for a few days after). Also note, many of the spices (depending on the dish) are used either whole or ground. This particular spice mix is never used ground...always whole.

Garam Masaala is a very common spice mix in Desi cooking. Today you will find it available in some larger grocery stores in a ground form, not just in Indian stores. This mix can be used whole or ground and often times is also used as a garnish, not just a base. The word "Garam" means "hot" and this relates directly to the nature of the spices in this mix. All of the spices in this mix are by nature hot.
In traditional Desi cooking, there is a belief that all ingredients (fruits, vegetables, herbs, spices, meats, etc.) have a certain "taseer" (genetic makeup or nature) to them. Some things are hot by nature, some are cold, some are soothing while others are acidic or indigestion inducing. There is a whole science and logic behind Desi cooking and a lot of it has to do with the nature of ingredients, thus what should be mixed with what and what should never be mixed with something, etc. The concepts are similar to the western logic of some vegetables being meant for summer consumption while others are meant for winter...it is based on their nature or the effect they have on our body once consumed. The spices required for garam masaala are:

Zeera
Kali/Gol Mirch (whole black pepper)
Long (whole cloves)
Sabuth Dhaniya (corriander seed)
Barri Ilaychi (large black cardamom)
Daal Cheeni (cinnamon stick)

For every day cooking I will use this mix whole but without barri ilaychi and sometimes without the cinnamon (depending on what I'm making and the time of year). Many times I'll use it ground as a garnish, but again without the barri ilaychi since it has a very strong taste. In some dishes you can substitute the barri ilaychi for choti ilaychi which is green cardamom, for example when making pulao. Some people also like to add bay leaf into this mix which is nice for some rice dishes and curry's but not traditional in the garaam masaala you can pre-mix and keep for regular use.

Gosht ka Masaala, "Gosht" refers to red meats like beef, lamb and goat. This masaala is used to make traditional Muslim meat curry's (gosht ka salaan). Murghi (chicken) and Machli (fish) salaan's get different spices, so be careful as not to use this for white meats...the spices will be over powering. Salaan is usually made with onion and garlic, gosht ka salaan also gets ginger and either tomato or yogurt; plus the spices I'm about to list out. Gosht ka Masaala is:

Haldi (ground tumeric)
Laal Mirch (cayenne or red chili powder)
Salt
Kali/Gol Mirch
Long
Pissa Dhaniya (ground or powder corriander seed)
Pissa Zeera (ground or powder cumin seed)
(some people like to add cinnamon but its not traditional)

Well I will leave you with these basic masaalas for now and write up some more traditional concoctions for you later. As always, if you have any questions/concerns don't hesitate to reach out.
Good luck and be creative!

Friday, February 13, 2009

Basics II - Bhagaar

So the second thing I'd like to discuss as regards basics is "bhagaar". Most desi cooks know "bhagaar" to be the garnish for lentils and some curry's. The truth is bhagaar can be either the BASE or GARNISH for a number of different dishes. Any time you heat oil with various spices, herbs and/or onion it is called bhagaar.

The purpose behind bhagaar is to add flavor and also aroma to your dish. When cooking desi vegetables, one often uses different spices to prepare the bhagaar before adding the main vegetable. Most lentils get fried onion, red chili and/or cumin seeds as the garnish just before serving. Most spices release their flavor and aroma once they are heated, hence the heating in oil of spices to enhance a dishes flavor. One thing to note, often times people tend to over cook desi food because they feel they need to really heat/saute (bhuno) the sauce or spices. This merely burns or overcooks the sauce or food and doesn't enhance or add to the flavor. Here in lies the importance of using bhagaar as a base to your cooking. By doing this you avoid overcooking the rest of your ingredients, keeping them fresh and flavorful.

Finally I get around to taking a picture! Hope this helps...


Tuesday, February 10, 2009

Covering some basics

I was going to post the recipe for one of my favorite vegetables today, but as I sliced onions, I thought about when I first started cooking. You see, my father taught my mother how to cook after they got married. She was after-all only 16 years old and my father, an extremely picky eater. Growing up, he used to spend a lot of time with his Nani (maternal grandmother) and would see how his sisters were being "trained" to be good girls/wives. He of course learned the traditional methods to everything! Cooking, sewing, putting on henna, embroidery... you name it, he could do it (or figure it out pretty quick). So when my dad and his brothers landed up in this country with no sisters, mother, Nani or maids to cook for them; my dad took on that responsibility. If he could do it for so many years, how could his wife not jump right in! Thats how the daily kitchen battle in our house began... little did anyone know, it would never end!

Over time, and in our (the kids) humble opinion, my mother became the better cook. My father started to reserve his cooking to only delicacies and special events or parties...my mom did the every day cooking. When we moved to Pakistan, things changed a little. There was no need for either parent to cook, but they did have to train all the khansama's (cook's) that ever worked for us. No one could ever please my father, there was always something missing or overdone. When I started cooking, rather started dabbling in the kitchen now and then, it was always a nightmare.

If ever my father saw me in the kitchen, he would observe and then discipline. In his mind, EVERYTHING I did was wrong because it was not the way his grandmother or mother had done it. It wasn't the way he would've done it. There was always a battle and God forbid if I ever made something the way my mom taught me as opposed to his way. For the longest time, I stopped going in to the kitchen any time my father was around. But many years later, I realized how much I had learned through all that tension. In the following few posts, with a lot less stress and fuss, I will share with you some basics that will guide you through any type of cooking and help in honing your culinary skills.

First lesson: ONION BASICS

I'll spare you how I came to learn this fact but there is a "proper" way to slice onions. Most desi cooking, vegetables or meat curry's, require sliced onion. Rarely do you use chopped or diced onion in cooking. After peeling the onion and cutting it in half, its important to remover the "eye", which is the circle at the bottom of the onion where all the layers come together. Also, you slice the bulb in half through the top and bottom; not through the center (wide part) of the onion. Once you've removed the eye, slice across the onion to form semi-circle slices (see photo). Do NOT cut along the onion, meaning cutting the onion length-wise getting thick slices.

I don't know if its true or not, but my father would say that the onion doesn't dissolve nor brown properly if it isn't sliced right. He also insisted that if it didn't dissolve, the taste was different. This second tid-bit I have to agree with. Many times I've tasted vegetables or curry's prepared the way I would make them but the only difference is the onion... it really does taste different if it doesn't dissolve properly.